Pages

Tuesday 12 February 2013

Download Google Chrome Portable Version 24.0.1

Google Chrome is the best and fastest web browser among web browsers software. Most of us use Google Chrome including me as our web browser for fastest access in the web. It has more than 310+ million users worldwide. If you are really a fan of Google Chrome and if you are very much used to it, then certainly you may wish to carry it wherever you go.


Now Google Chrome has released the latest version of Google Chrome portable version 24.0.1312.57. This latest version of Chrome portable is designed simply and stylish. You can have your,
Favorite bookmarks
Saved passwords
All History and everything that you want at any time. 

You can simply install Chrome Portable setup file into your USB pen drive, and start web browsing from anywhere and from any PC. Portable Chrome is having all the features which you get in a usual Chrome PC version.


“Like us” on Facebook to engage with us and stay informed of news and information...

Monday 11 February 2013

How to use a USB Flash Drive for RAM Memory?

We use USB to transfer the data’s. The USB can be used as RAM. Let’s start with windows vista; those who use pc's can use their USB drives to increase the performances of their computer. This is called ReadyBoost.  Ready Boost deal with free space that is on your USB drives, such as RAM. When we increase RAM that’s equal to more speed.  Ready Boost comprise on all free versions of windows vista and windows 7. It’s easy to setup the positions and in few minutes it can be finished.

  • Insert the USB drive in your computer.
  • Go to "My Computer" then right-click on the USB drive. 
  • Go to "Properties"
  • Next, click on the "ReadyBoost" tab.
  • Choose the option that says "Use this device".
  • Under "Space to reserve for system speed", select the amount of memory that you wish to use for your USB flash drive. The amount of memory that Windows recommends is usually the best setting and should not be exceeded.
  • Click on "OK" to save your settings and exit.
  • Restart your computer for the changes to take affect.
“Like us” on Facebook to engage with us and stay informed of news and information...

How to Hide any Local Drive using Command prompt

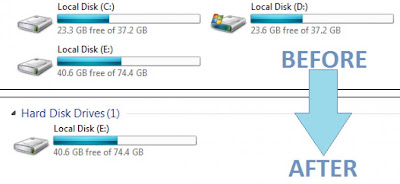
Today Computer World tutorial is about how to hide a local drive without any 3rd party software. There are lots of free and payable software's available to hide local drive, but I'm not gonna talk about hide a local drive using a software. In this tutorial I'll show you an easiest way to hide local drive without using software. This will save your both money and time.

There are 3 methods available to hide a local drive without using any software

1. Hide a drive through gpedit
2. Hide a drive through regedit
3. Hide a drive using command prompt

Today we are covering command prompt way of doing it. So lets see how to do.


How to Hide a Local Drive using command prompt?

1. Click on Start - Run

2. In Run box type cmd and hit Enter. Now Command Prompt window will appear. 

3. In command prompt, type diskpart and hit Enter.

4. Then type list volume and hit Enter.

Now it will display the list of all your computer drives details.


5. Then type the Drive Letter which you want to hide.
If you want to hide volume E, type select volume E and hit Enter.

Now follow mentioned massage will appear to you.
Volume 4 is the selected volume


6. After that, type remove letter E and hit an Enter.

That's all, you have done. Now restart your computer once. When you start your PC again, you want be able to see the particular drive in My Computer.


How to get back Hidden Drive again in My Computer.

Do the procedure which i have mentioned in step 1,2,3,4 and 5 again.

Click Start --> Run --> cmd -->

Then type diskpart - list volume - select volume E

After that type assign letter E and hit Enter.

That's all !! You have got back the hidden local drive. Once again restart your PC, now you will be able to see hidden local drive in My Computer.

Note: Your PC doesn't lost any data by doing this trick .

“Like us” on Facebook to engage with us and stay informed of news and information...

Bitdefender Released New 60-Second Virus Scanner

Today i came up with a superb free anti-virus software. There are hundreds of free and payable anti virus software available on internet but today I'm gonna give you a special anti-virus protection for your PC. Most special thing in this is, it will save your precious time. You can scan all your system just within a minute.


Bitdefender introducing 60 second virus scanner for all the users, which can scan your PC's all system within just a minute. This new arrival can scan all the critical areas of your system for malicious threats within 60 seconds. Bitdefender 60-Second Virus Scanner is fully supports with Windows 8, Windows 7, Vista and XP. 

After the installation completes the 60 second scanner program will reside on your desktop as a widget. By clicking on it you can start 60 second quick scan on your PC. When you click on Bitdefender widget, it will start proactive silent scanning which can automatically performs all scanning processes in the background.


Click here to Download Bitdefender 60 Second Virus Scanner

“Like us” on Facebook to engage with us and stay informed of news and information...

Friday 8 February 2013

Google invites India to help create better Maps with Mapathon 2013


Google has announced its first ever Mapping competition, Mapathon 2013 in India. The competition, which starts on 12 February and goes on till 25 March 2013, involves the task of creating better maps for Google. The Mapathon is open to everyone living in India, and participants are required to add their knowledge of local places through Google's Map Maker, a web based tool for improving maps, which was conceptualized in India more than 4 years ago. Google says that the competition is a way of crowdsourcing to get the most comprehensive, accurate and easy-to-use maps of the country.

Google Map Maker allows users to add more detail to Google Maps through a few clicks. Users can select a specific area on Google Maps and add new information, including adding and editing places, based on their own local knowledge or by referencing Google Maps satellite imagery. They can then can save and submit their inputs and after verification of the changes, the new information is added to Google Maps.


Highlighting the USP of Google Map Maker, Jayanth Mysore, Product Manager, Google India said, "It has always been our endeavour at Google to organize the world's information and make it universally accessible and useful. One way we hope to achieve this is by mapping the world and what better way to do this than by asking users to map their neighbourhood. Google aims to provide better maps for India by building better maps for the users, by the users. What started off as an initiative by a few Google engineers is now used across the world and today, citizens across India can participate in this great project through Mapathon 2013."

Google has opened up registrations for the Mapathon, and is incentivising the top 1,000 mappers by offering rewards including Android tablets, smartphones, gift vouchers and Google merchandise. Google had earlier conducted a similar Mapathon with the World Bank in South Sudan in 2011.

“Like us” on Facebook to engage with us and stay informed of news and information...

Windows 8 Transformation Pack 5.0 Full


Microsoft has launched Window 8 recently. But some old computers doesn't contain minimum system requirement to install Windows 8. So today I'm going to give you a Free Windows 8 transformation pack. 

We can transform our Windows 7 , Vista or XP to Windows 8 by using Windows 8 transformation pack. This free transformation pack will change our Windows user interface to Windows 8. 


Windows 8 Transformation Pack 5.0 allows to change the below mentioned things to Windows 8 user interface.

Boot Screen
Login Screen
Task Bar
Themes
Wallpapers
Icon
Sounds
Fonts, Etc .....

Updated : Due to some security season, Windows 8 Transformation Pack 5.0 has been deleted. Windows 8 Transformation Pack more recent version available for download.

Click here to Download Windows 8 Transformation Pack Latest Version

Transform your Windows user interface to Windows 8 & Enjoy !!! :)

“Like us” on Facebook to engage with us and stay informed of news and information...

Thursday 7 February 2013

Now Zoom out Facebook Thumbnail Photo is Possible

It's quite easy to Zoom out Facebook thumbnail Photo and you can see it properly. As Facebook thumbnails are quite smaller and not easy to see properly sometimes. Using shown method, you can just take your mouse over any thumbnail on Facebook and without clicking you can see a larger image of the thumbnail pic.

Let's see how we can zoom out a thumbnail photo on Facebook.

Step 1: Install extension for Google Chrome, based on your browser.

Step 2: Restart your web browser

Step 3: Login to your Facebook Profile

Step 4: Take Mouse over any friend's thumbnail and just wait for a second (Don't click)

Step 5: you can see Zoom out image as per below


Hope this Post will help you to use your Facebook more better.

“Like us” on Facebook to engage with us and stay informed of news and information...

Secure your Google Chrome with Password

We can protect our Google Chrome with Password. We can secure Saved Password, Important Bookmarks, etc... with this "Simple Password Start-up  Extension. So let's see how to secure Google Chrome with password.


Install the "Simple Password Startup" Extension in your Chrome
Then go to "Tools" --> "Extension" --> "Simple Password Startup" --> "Option"
After that Enter a Password and Save it.
Now your Google Chrome is secured with Password. 


If you want to open your Google Chrome, every time you have to type the password in home page. If you type a wrong password, Chrome will be closed. Without knowing the password we can see only the "Home page" in chrome.


This is a very easiest way to protect your "Saved Password" and "Bookmarks" from unknown persons.

Note: Don't forget your Startup password, if you forget the password, you can't recover it.

“Like us” on Facebook to engage with us and stay informed of news and information...

Use Gmail Without Internet

Gmail offline allows us to read, respond to, and search without network access. So even if you are offline, you can open your web browser, go to Gmail.com and get to your mail just like you are used to.


Click here to Install offline Gmail

How to start Offline Gmail
  • After installing, open a new tab in Chrome.
  • In the new tab panel you will see a Gmail Offline Icon
  • Click on the Icon, and then Offline Gmail will load.
  • Now you can keep reading mails and also any new messages you compose will be sent out the next time you connect to internet.
Note: This is only available in Google Chrome.

“Like us” on Facebook to engage with us and stay informed of news and information...

Wednesday 6 February 2013

HOW TO CONVERT NON-TOUCH SCREEN INTO TOUCH SCREEN


Friends I know  after reading title of this post you are thinking i am kidding, But friends i am very true with my post, now it is possible to convert non-touch screen into touch screen. Some days ago Jeswill HiTech Solutions Pvt. Ltd. introduced a new hardware kit to convert non-touch screen into touch screen.

Company is saying that they developed this product because recently Microsoft launched Windows 8 which got a very high popularity, But users can not enjoy the original  experience of windows 8 on their non-touch laptop or pc and if the user will go for new touch screen LCD for his pc then it is cost approximately Rs.10,000 more as compare to simple LCD and company is providing this kit at very low price i.e only @ Rs.4999/-


So lets discuss something about this product.


WHAT IS E-TOUCH PEN ?

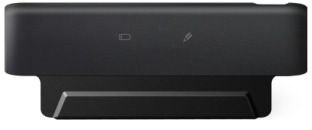
E-Touch Pen is a device who uses Ultrasound and Infrared technologies, consists of ultrasonic digital stylus and a small receiving unit. This device is designed specially for Windows 8 and it 
enables all non-touch Laptop screen with touch features.

WHAT ARE COMPONENTS OF E-TOUCH PEN ?

E-touch pen kit contains only three components which are giving below:-

1> Cordless electronic pen (Including special refill and batteries)


2> Detachable base unit,


3> USB cable connection to PC 


For more Information Check out This Video


“Like us” on Facebook to engage with us and stay informed of news and information...

Tuesday 5 February 2013

Emoticons and Smileys in Facebook Status Soon


We already start using Smiley and symbols on Facebook comments, chats etc. But still we are not able to place Smiley over Facebook status.

But there are few days left before Facebook will release new feature for those who love to place ":(" and express their sorrow or ":D" and express their happiness.

New feature of Inserting Smiley in Facebook is still under Testing by social media giant Facebook. As per the news, Facebook will allow you to add icons/smileys belongs to different categories like feeling, reading, eating etc.

We already got a change while publishing our status and as per that we been asked what has been going on and how you feeling while posting status.


Emojis to show feelings will be incorporated with new status composer, also there could be pre-designed smileys while composing new status.

New status updater will help advertisers too by knowing the type of status of a person. Meaning, if a Facebook user will place status of Watching Movie Emotion with particular cinema hall, based on their status Facebook will place relevant advertisements on the page.

Let's see how new facility of allowing users to update status with smiley will attract existing users of Facebook.

“Like us” on Facebook to engage with us and stay informed of news and information...

Monday 4 February 2013

The Wireless Power Transfer Technology For Charging Mobile

Tech company develops tablet that can charge your phone by just pressing the two devices together

New technology is arriving for next generations of tablets, which is going to charge Smart Phones not by connecting with them, but just pressing these two gadgets together.


In current gadget-lover generation, it's quite difficult to carry charger each and every time. Sometimes we may forget to carry that. New feature will be quite useful for people specially who are keep travelling.

As per ABC News, Fulton Innovation techno company has already installed a wireless charging device on Samsung tablet which is using Qi wireless power transfer technology that helps charging of electronic devices by simply placing the device over the power station attached to an outlet and there isn't any need to plug device anywhere.

As per News channel, techno company has inherited this from some existing technology and used Samsung Galaxy tablet to install a prototype on it.

By installing new wireless technology's power station over thin tablet will definitely not affect existing appearance or thickness as per company spokesman.

Let's wait for further information and we hope in near future we are going to get a new technology to charge mobile by pressing it over a tablet.

“Like us” on Facebook to engage with us and stay informed of news and information...

How to Remove Manually Autorun.inf Virus From Computer

We usually found virus on our Desktop, laptop, PC etc. I always recommend to Maintain Your laptop and Keep your System Secure. By doing this there are less chances to get your system infected with virus attacks. We usually found Autorun.inf virus on our system or USB, which could be dangerous sometimes. Here I will demonstrate easy steps to remove Autorun.inf virus manually from PC, USB or laptop.


How to Know if your system is infected with Autorun.inf virus?


Firstly, we must know if our system is really infected with this virus!! Follow below steps to check:

1> Go to My Computer
2> Right click C Drive
3> If option with "Play" comes, it means your system is infected with Autorun.inf virus


How to Remove Autorun.inf virus completely from your system?

  • Disable CD, DVD or USB Autorun using windows utility suggested as below
  1. Click start Run and type GPEDIT.MSC to open Group Policy editor window
  2. On the left side panel expand Computer Configuration -> Administrative Templates -> System.
  3. Locate the "turn auto play off" panel at right side
  4. "Enable" that by double click or options
  • Open Winrar.exe (If you don't have Winrar installed, you can download from net easily)
  • Browse for infected drive with Autorun.inf virus with the use of winrar explorer
  • You easily can see hidden files under winrar explorer.
  • Fine the file named Autorun.inf and open it using notepad
  • You can see .exe file mentioned in that Autorun file. This exe file is the main culprit. Kindly note that name of exe file and close autorun.inf file
  • Search for .exe file we found inside autorun.inf within drive (Ex: c:/) and Delete it along with Autorun.inf
  • Restart your Operating System.
I guess Now your system is free with Autorun.inf Virus.
You can Repeat the same process if your Usb or Pendrives are infected with Autorun.inf virus.

“Like us” on Facebook to engage with us and stay informed of news and information...